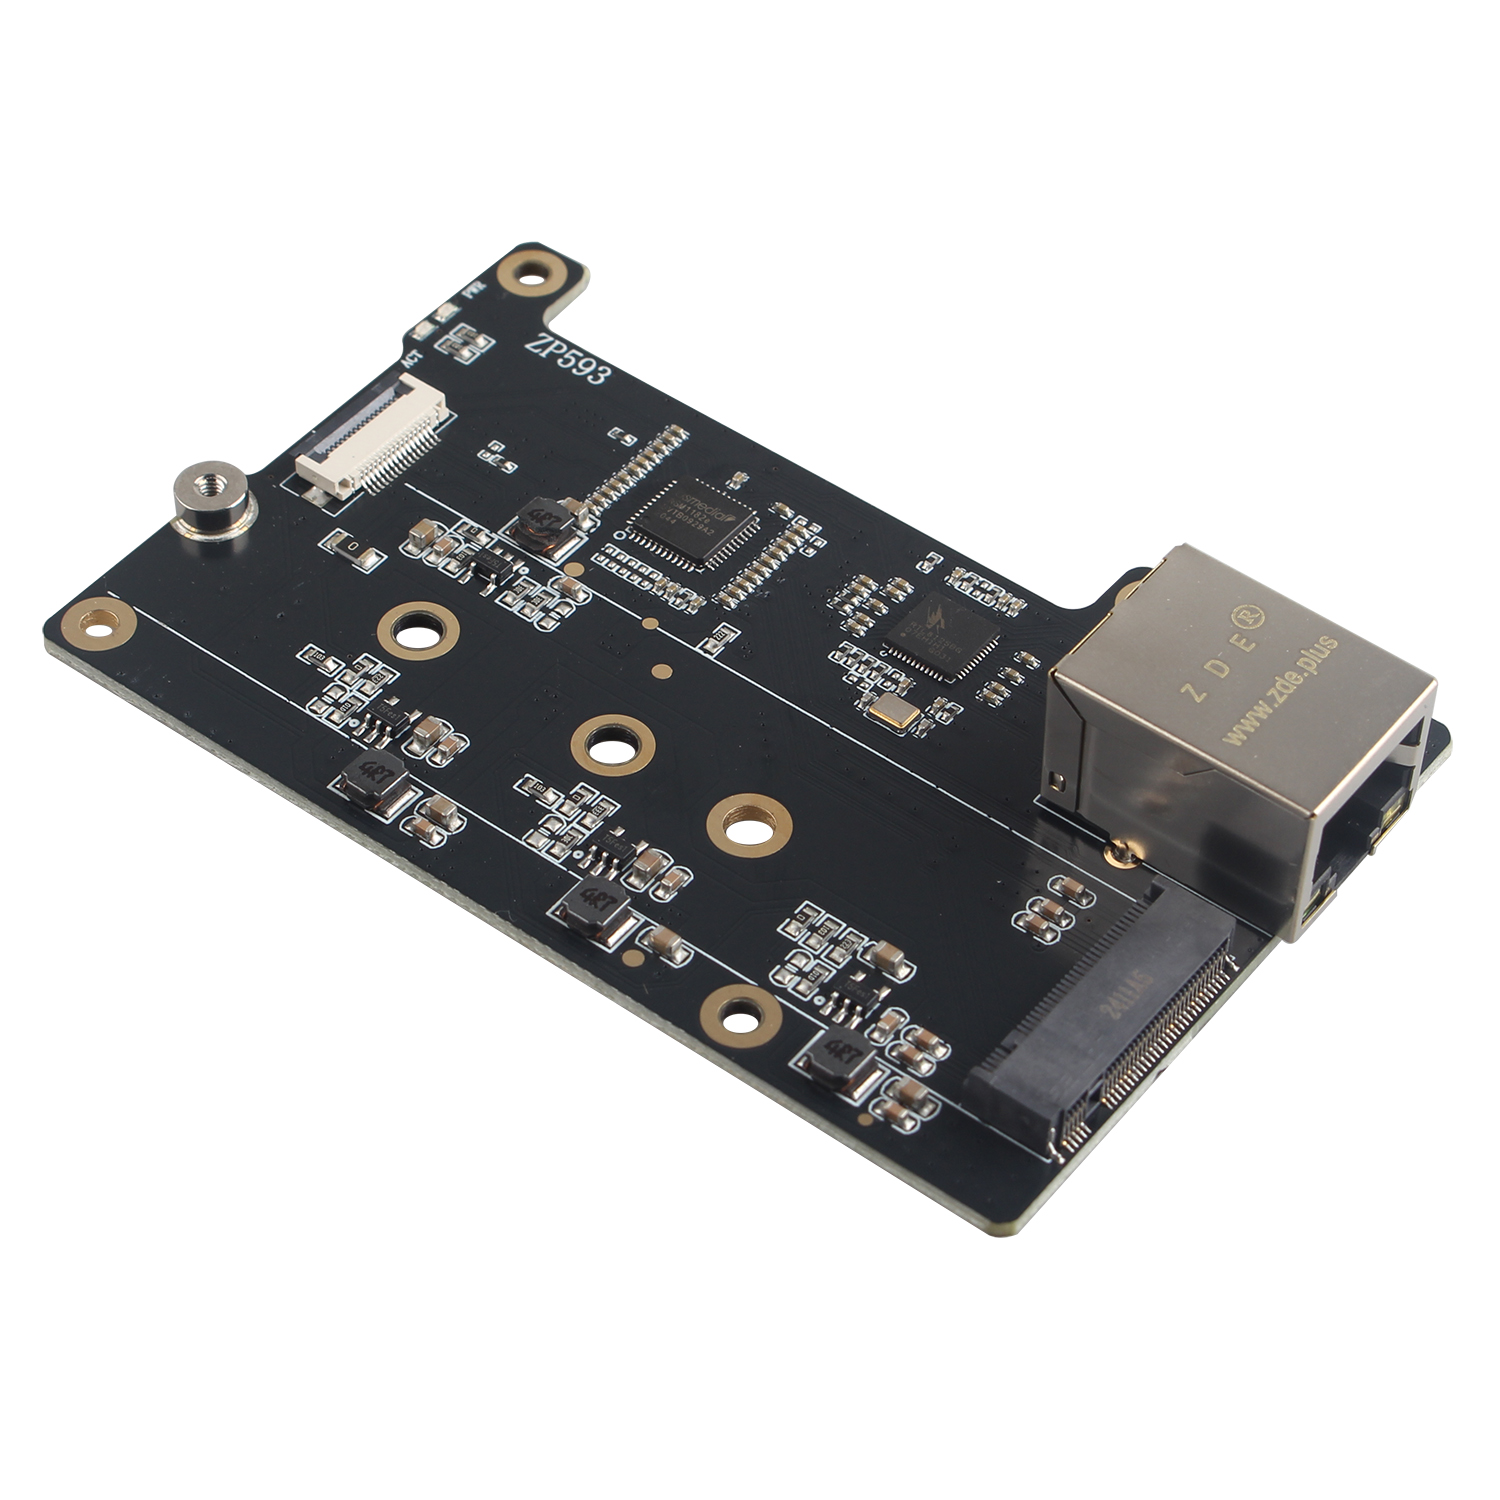
ZP593 PCIe to 2.5G Ethernet PCIe to M.2 Key-M NVMe SSD HAT Expansion Board
|
||
Overview
Introduction
This expansion board adds one 2.5G network port and one M.2 Key-M interface for Raspberry Pi 5, which can meet your various needs for those who need to use Raspberry Pi 5 as a router, gateway, firewall, and other network devices that need more than one network port.
Features
• Through the PCIe interface with PCIe Switch chip to expand into two PCIe interfaces and then through the RTL8125 chip to achieve the expansion of 2.5Gbps Ethernet and M.2 Key-M NVME.
• After power on, the board can be automatically recognised as eth1 without driver under Raspberry Pi official OS/OpenWrt system. However, when you use ubuntu system, you need to install the driver of RTL8125 and then you can use it.
• Support M.2 NVMe SSD for expansion and storage, compatible with M.2 KEY-M NVMe SSD in 2230/2242/2260/2280 length. Support boot from SSD, and it needs Raspberry Pi official firmware, which is at least 2024.5.13.
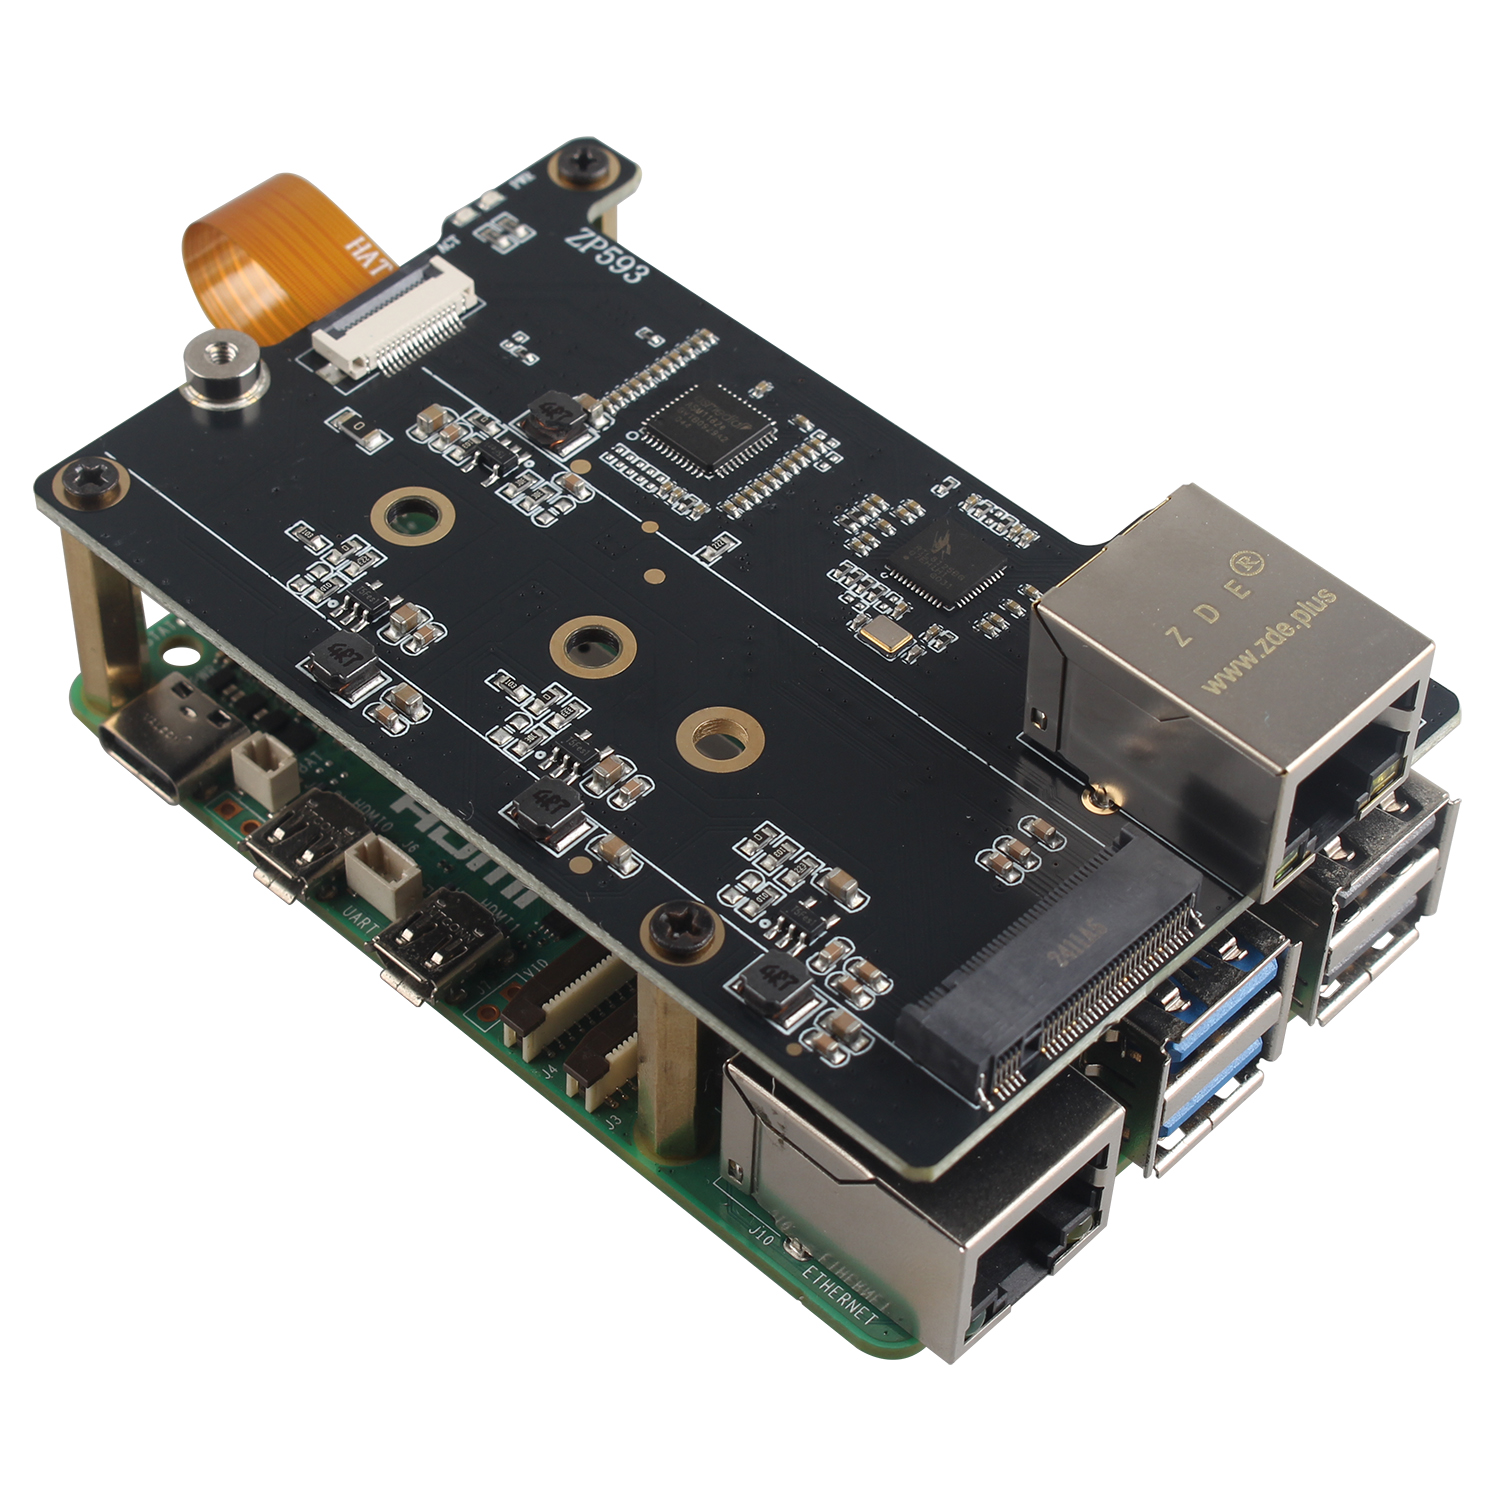
• With four M2.5 fixing holes, the concave design on the top of the board is convenient for the operation and use of 40Pin GPIO.
Installation Guide
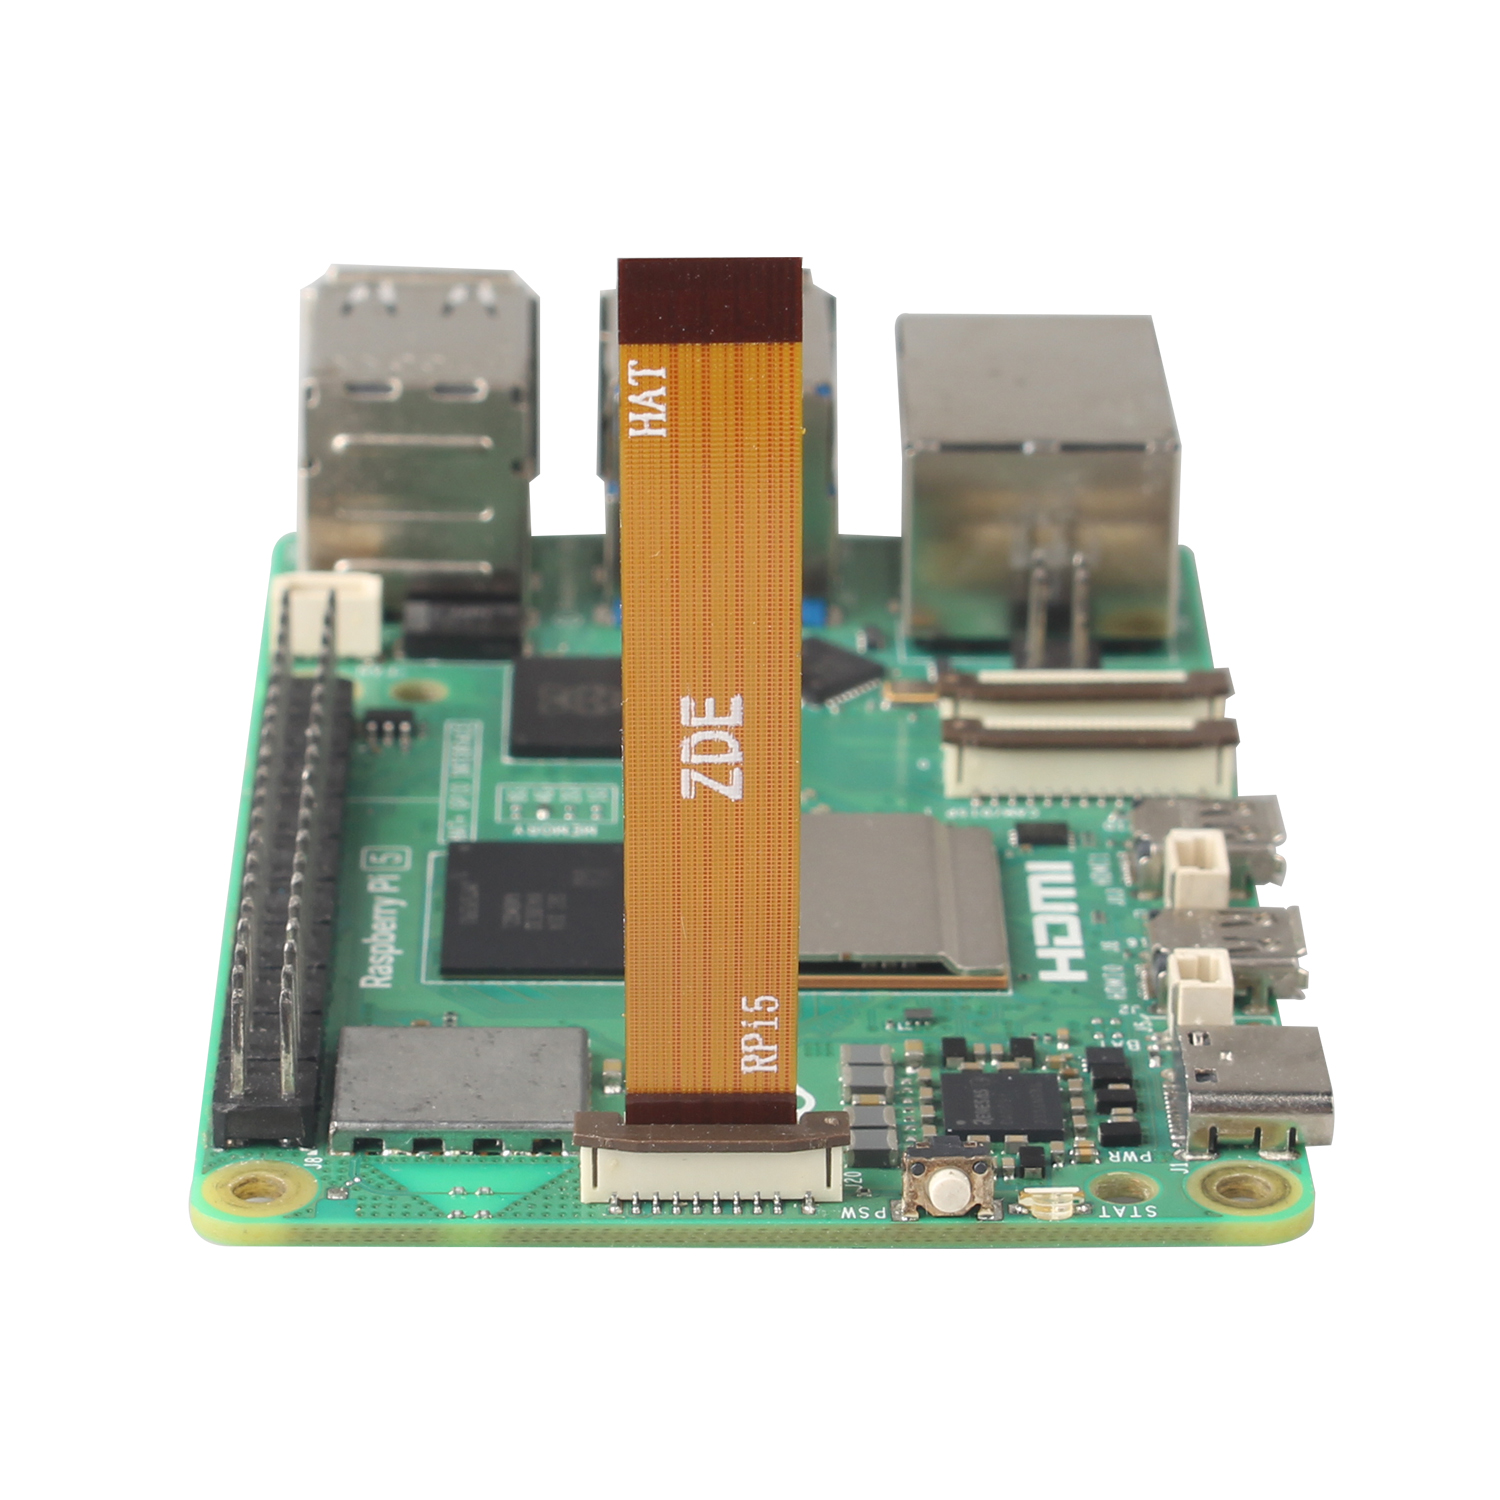
Installation of PCIe FPC Cable
Pay attention to the direction of the cable and connect it as shown in the figure:
Installation of adapter board
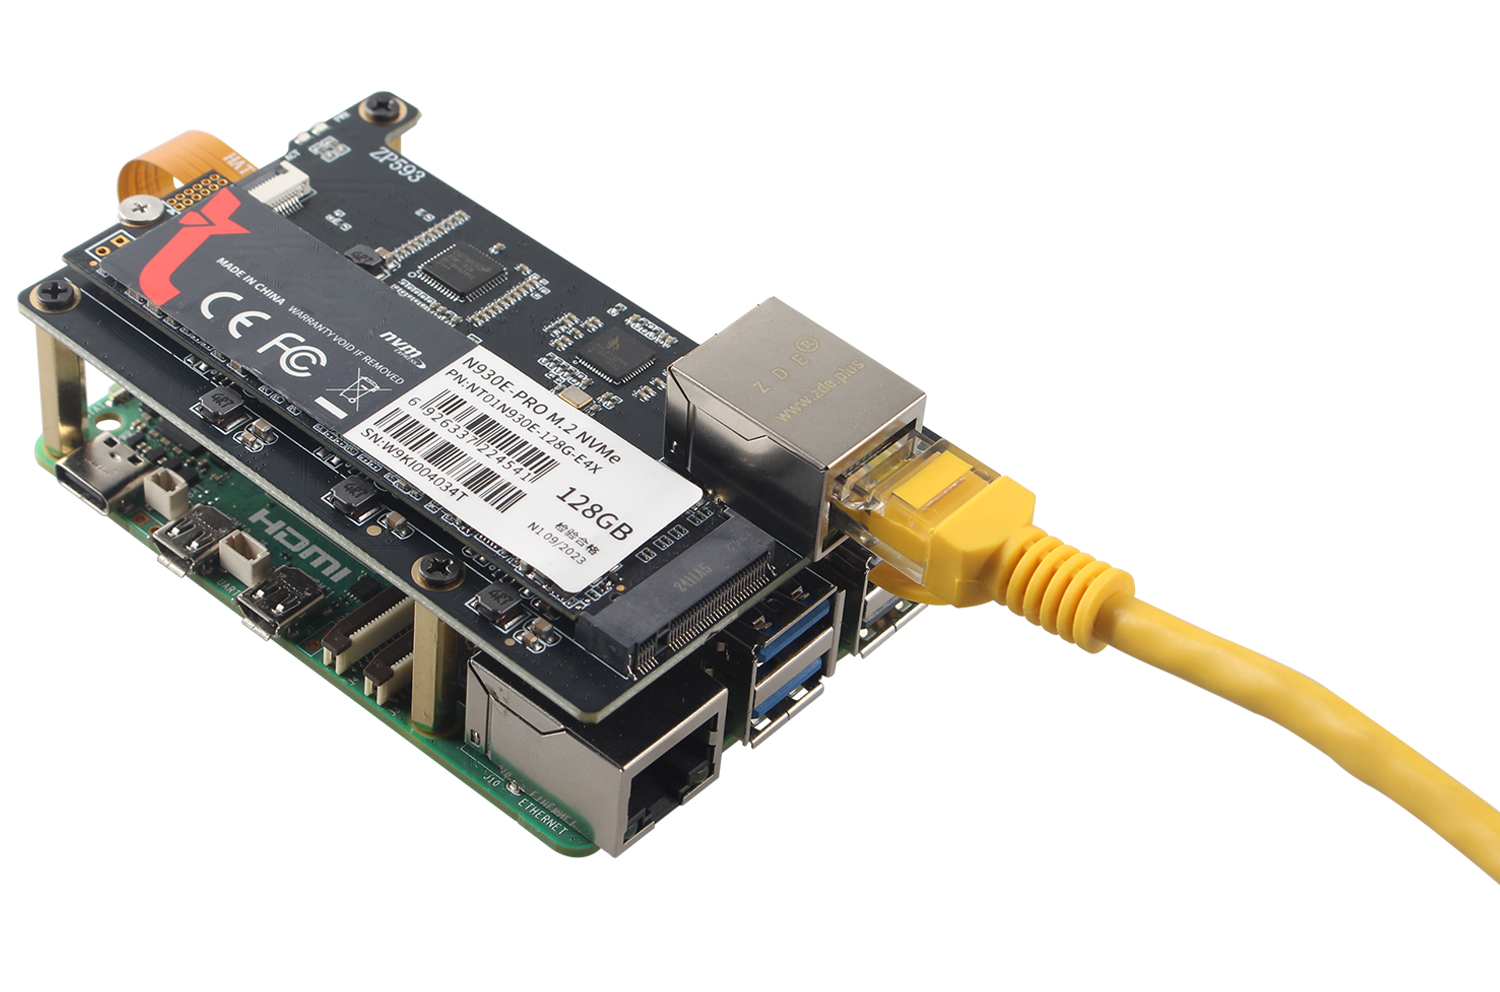
Installation of M.2 NVMe SSD
• Install 2280 SSD
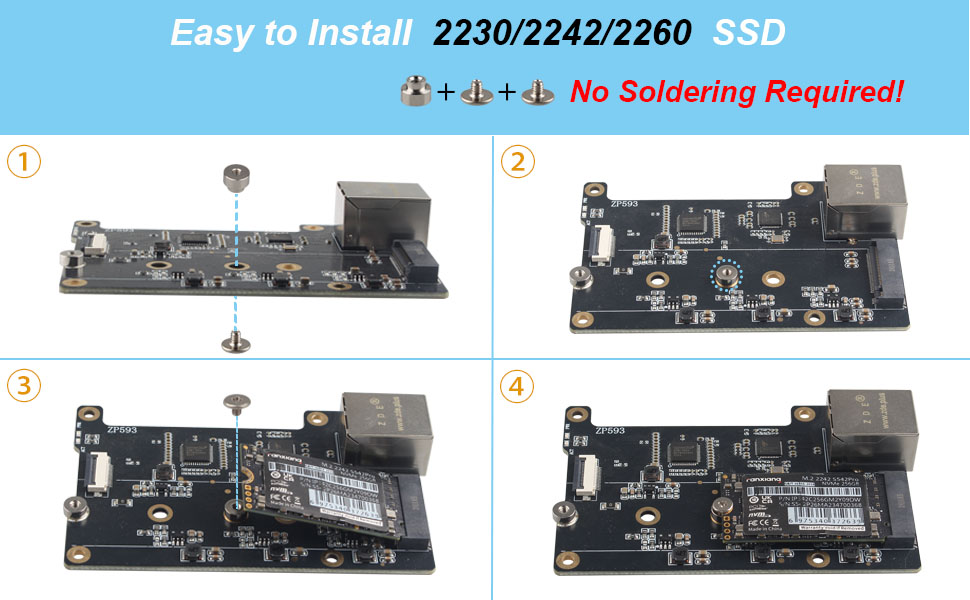
• Easy to install 2230/2242/2260 SSD
Guidance for Use
How to Use NVMe
Find your PCI device
First, check whether the adapter board is connected to the Raspberry Pi. Open Terminal and use lspci command to check.

The content of the first arrow appears to represent that the adapter board is connected successfully to the Raspberry Pi. Otherwise, check if the cable is connected properly.
The content of the second arrow appears to represent that the 2.5GbE network port identified.
The content of the third arrow appears to represent that the NVME SSD identified.
Enable PCIe
To enable the connector, add the following line to /boot/firmware/config.txt:
$sudo nano /boot/firmware/config.txt
add the following line
dtparam=pciex1
dtparam=nvme
Reboot with sudo reboot for the configuration changes to take effect.
Note: You can also use the alias nvme.
Boot from PCIe
By default, Raspberry Pi devices do not boot from PCIe storage. To enable boot from PCIe, change the BOOT_ORDER in the bootloader configuration. Edit the EEPROM configuration with the following command:
$ sudo rpi-eeprom-config --edit
Replace the BOOT_ORDER line with the following line:
BOOT_ORDER=0xf416
To boot from a non-HAT+ device, also add the following line:
PCIE_PROBE=1
After saving your changes, reboot your Raspberry Pi with sudo reboot to update the EEPROM.
PCIe Gen 3.0
Warning
The Raspberry Pi 5 is not certified for Gen 3.0 speeds. PCIe Gen 3.0 connections may be unstable.
The connection is certified for Gen 2.0 speeds (5 GT/sec), but you can force Gen 3.0 (10 GT/sec) speeds. To enable PCIe Gen 3.0 speeds, add the following line to /boot/firmware/config.txt:
dtparam=pciex1_gen=3
Reboot your Raspberry Pi with sudo reboot for these settings to take effect.
Write Speed Test
dd command can be used to test write speed.
The following command will write into a 2000MB file named “test” to disk:
$ dd if=/dev/zero of=./test bs=10M count=200

SSD Compatibility
Only for SSDs with M.2 KEY interface NVMe protocol.
Currently there are quite a few customers give feedback on SSD compatibility. We have done a lot of tests about the problem and the solutions are as follows:
1. Upgrade your system to the latest:
$ sudo apt update
$ sudo apt upgrade
$ sudo rpi-eeprom-update
Restart
Check the current bootloader version with the following command:
$ vcgencmd bootloader_version
2024/06/05 16:41:49
version 6fe0b091c7cb1c5da26b7f41cc24c42840531a83 (release)
timestamp 1717602109
update-time 1720508793
capabilities 0x0000007f
2. Replace the SSD with another model and use it again.
3. Our SSD adapter board is just a PCIe adapter circuit that doesn't affect SSD compatibility, and the SSD compatibility depends on the Raspberry Pi 5 motherboard. We have tested several Raspberry Pi 5 motherboards, finding that under the same test environment, one Raspberry Pi 5 motherboard can recognize all kinds of SSDs and has good compatibility; however, other Raspberry Pi 5 motherboards’ compatibility are not so good, which can only recognize some SSDs. Therefore, replace the Raspberry Pi 5 motherboard with other batches is also a good solution.
How to Use Ethernet Port
Raspberry Pi OS
Open Terminal and use the following command:
ifconfig -a
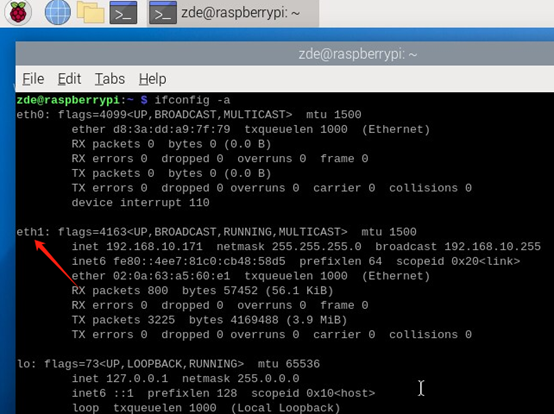
If eth1 appears, it means that our ZP593 hardware is connected successfully and the network device eth1 appears. Otherwise, check whether the FPC cable is installed normally.
At this time, we can connect network cable to this network port, and then it can communicate normally.
Ubuntu
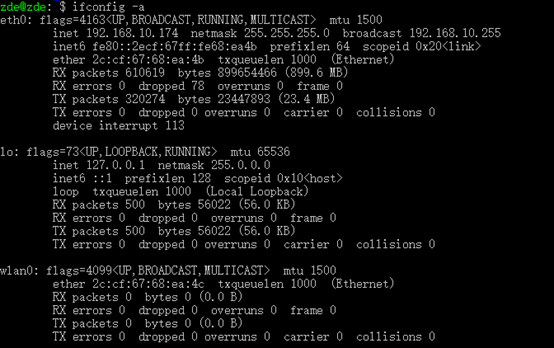
Use ifconfig -a command to see that there is no eth1.
ifconfig -a
Use the following command to install:
sudo apt-get update
sudo apt install net-tools
sudo apt-get install --reinstall linux-headers-$(uname -r) linux-headers-generic build-essential dkms -y
sudo apt-get install r8125-dkms
sudo modprobe r8125
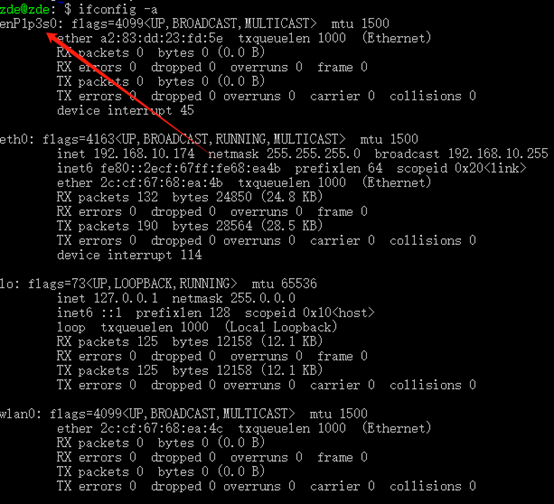
ifconfig -a
Use ifconfig -a command to see that there is an extra network device as shown below:
OpenWrt
OpenWRT is a highly modular and automated embedded Linux system with powerful networking components and extensibility, commonly used in industrial control devices, telephones, robots, smart homes, routers, gateways, firewalls, NAS and VOIP devices. The OpenWrt SDK is a great convenience for software developers who benefit from it, simplifying the work of developing software.
The following introduces the process of compiling the RTL8125 driver to OpenWrt, please customise it yourself if you have other needs.
1. Install required tools for compilation
Install required tools on the operating system of Ubuntu, Debian, Raspberry Pi OS; for most Linux-based systems, the following commands can be used:
sudo apt-get update
sudo apt-get install build-essential libncurses5-dev zlib1g-dev gawk git wget
2. Clone OpenWrt source code
git clone https://git.openwrt.org/openwrt/openwrt.git
3. Use the following command configuration to operate the system
cd openwrt
./scripts/feeds update -a
./scripts/feeds install -a
make menuconfig
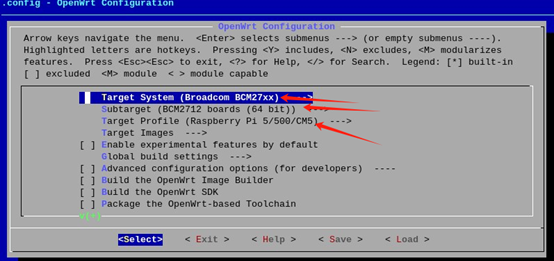
Select the configuration corresponding to Raspberry Pi 5, select System Boardcom BCM27xx for Target, BCM2712 for subtarget and Raspberry Pi 5/500/CM5 for Target Profile.
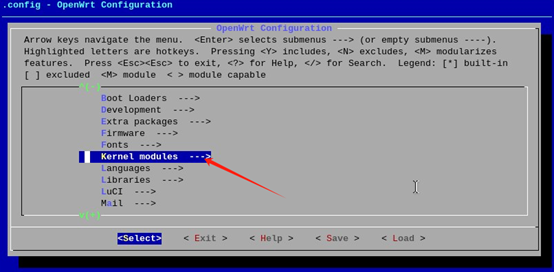
Select “Kernel modules” to enter the kernel modules.

Select “Network Devices”.
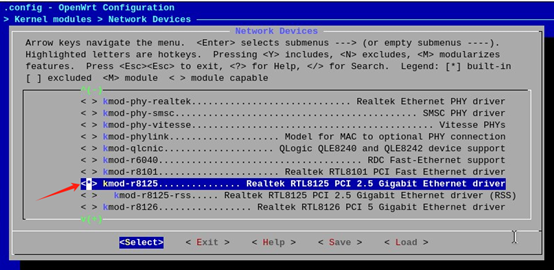
The network chip we use is RTL8125, so select kmod-r8125 here, and the ‘*’ sign is on the left after you select it.
Save our configuration.
4. Compile
make V=s -j1
5. Copy the compiled firmware
cd bin/targets/bcm27xx/bcm2712/
ls

The arrows point to the generated firmware, you can select one of the files to copy out.
6. Write firmware
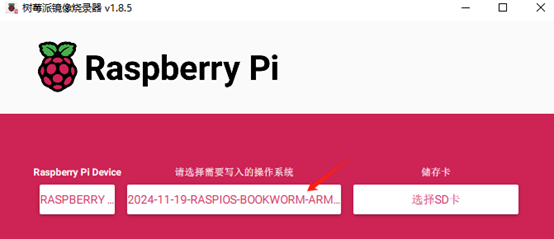
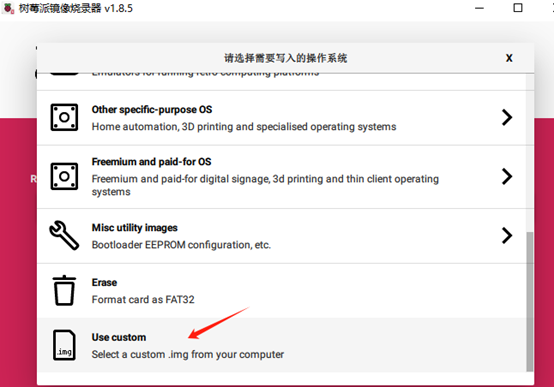
Use Raspberry Pi Imager to write operating system into Raspberry Pi 5. Use the method “Use custom” as the following picture shows:
After writing into the TF card, insert the TF card to Raspberry Pi 5, and then power it to run.
7. Run OpenWrt firmware
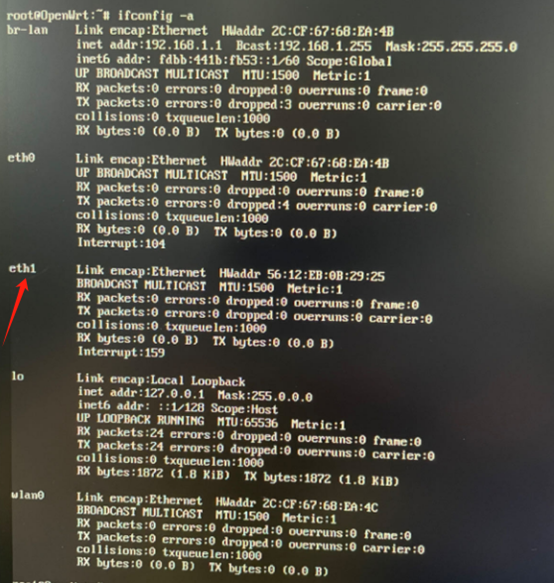
Checking with the ifconfig -a command after booting shows an additional eth1 device.
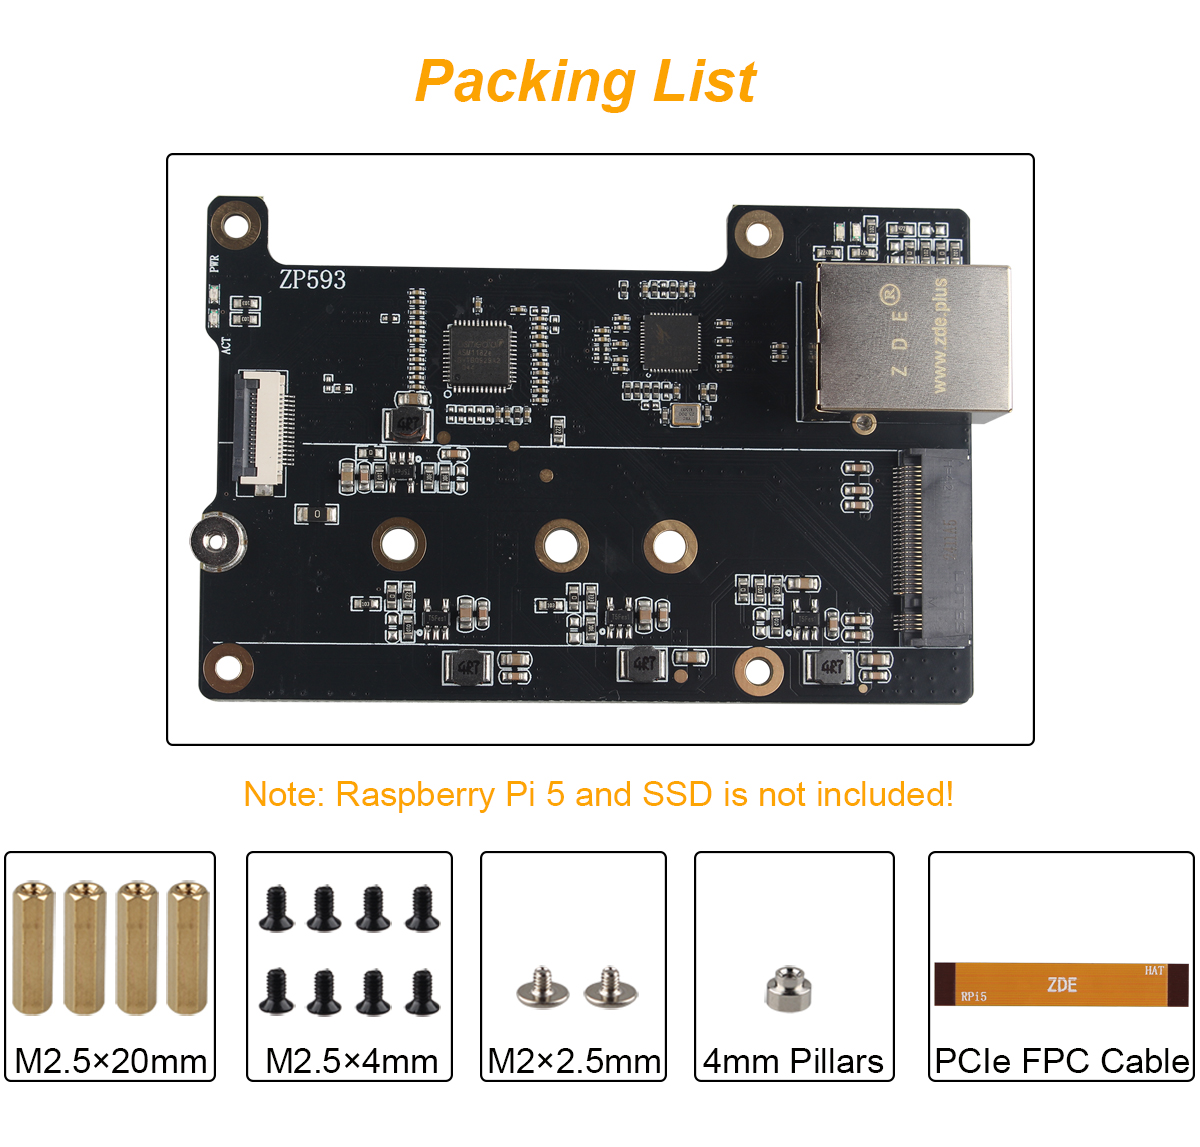
Packing List
Support
If you have any question or need technical support, please contact: support@zde.plus.